Archive
Bubble Evader
Lets proceed to create our game. XNA Game Studio uses Visual C# for programming. So, you need to be aware of some basic concepts of Object Oriented Programming(OOP) like Objects, Classes, Inheritance etc.. You can learn some of these basic things here. To create a game for Windows Phone 7, you will need Visual Studio 2010 & XNA Game Studio 4.0 along with other Windows Phone 7 developer tools, which you can get here for free. Once you have downloaded and installed Visual Studio, go to File->New Project. Under Visual C# pane on the left you go to XNA Game Studio and select Windows Phone Game(4.0) option, as you can see in the image below.
When the project is created, the Visual Studio IDE puts some predefined code into your project which looks like as in the image below. The lines in green colour are the comments which are ignored by the compiler, which is there for the user’s reference. You can minimize the methods by clicking on the minus (‘-’) sign on the left side of the method(function) names. Once collapsed, they would look as in the picture to the right.
Now you can see all the predefined methods & a class. Game1 is the class where all the action takes place. It contains variables and methods for various things that you do in the game. It forms the main control. It consists of main 5 methods that keep the game running.
- Initialize
- LoadContent
- UnloadContent
- Update
- Draw
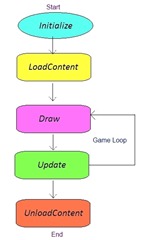
These methods form what is called as a game loop, which continuously keeps the game running, which can be represented in a flowchart.
Initialize is the first method that is called when the game starts. So any initializations to be made (ex: Setting the number of enemies) will go here.
LoadContent is the method that contains code to load game resources like sprites, backgrounds, audio etc.. onto the memory.
UnloadContent is the method used to unload the loaded resources from the memory at the end of the game.
Draw is the method to draw whatever we want on the game screen. It may include various sprites, objects etc.. and their respective positions on the screen.
Update is the method which is called whenever there is an update to the scene to be made (ex: When the user presses a key for the sprite to jump, etc.) This method is followed by the Draw method again. These two methods form what is called as a Game Loop, which stops only when the game is exited.
We also need to understand all things that constitute a game. Lets start with Sprites. A sprite can be regarded as a picture that you would want to associate with a player or any object like enemies, walls, doors, etc..
This is a screenshot from one of the most famous games of all times, Mario. The smaller image you see is called as a sprite. It is used to draw on the screen as you can see in the bigger picture. All those bricks and walls used in there are also sprites, which are used multiple times in the same scene. Sprites are of two types, Transparent(.png or .gif) & non-transparent(.jpg). If you use a non-transparent sprite, the entire image(including the background) gets drawn on the screen. When you use transparent sprites, the background will not be used while drawing that sprite on the screen. You don’t want a padding around your sprite while playing a game, do you? So, its obvious to use transparent sprite.
For this game, our sprites would be a simple circle and a square, which can be created using very basic image editors like MS Paint. But I would recommend a better & free tool called Paint.Net which I used and has better transparency support. A simple set of Instructions on making a sprite transparent in Paint.Net can be found here. Here are my sprites, a square and a circle.
Now, in the solution explorer(Its a pane in the right side of visual studio) right-click on the Content and go to Add->New Folder. Name that folder as Images. Now right click on Images folder and Add->Existing Item. Go to the location where your sprite is in your computer and add that image file of your sprite to the project. You should be able to see the filenames of the images in the Images folder.
In the Game1 class, you can see that a GraphicsDeviceManager and a SpriteBatch object have been defined. Here, graphics object corresponds to the graphics device to which you will be interacting to do various things in the game, and spriteBatch object is to draw sprites, which contains many methods for different situations.
GraphicsDeviceManager graphics;
SpriteBatch spriteBatch;
Now, define a Texture2D object in your Game1 class after the above code, name it whatever you want. This object will be used to load the image as a texture to draw it on the screen.
GraphicsDeviceManager graphics;
SpriteBatch spriteBatch;
Texture2D texture;
Now, go to LoadContent() method and type the following line of code. Your LoadContent() should look like below. It loads the square image to texture object.
protected override void LoadContent()
        {
            spriteBatch = new SpriteBatch(GraphicsDevice);

            texture = Content.Load<Texture2D>(@"Images/square");
        }
Now, go to Draw() method and add the following lines of code. It should look as below. This code draws the sprite stored in texture object at position (0,0) on the screen.
protected override void Draw(GameTime gameTime)
        {
            GraphicsDevice.Clear(Color.CornflowerBlue);

            spriteBatch.Begin();
            spriteBatch.Draw(texture, Vector2.Zero, Color.White);
            spriteBatch.End();

            base.Draw(gameTime);
        }
spriteBatch requires you to call Begin() and End() before and after we do any operation with the sprites. Now, run your project by pressing F5 key. You should be able to see the emulator running with a blue background and a square at top-right corner of the emulator screen. Ideally, it should have been at the top-left corner, but XNA treats Win Phone 7 to be in portrait mode by default and hence you see it at top-left corner as seen in portrait mode.
Now, lets try moving a sprite. Create another Texture2D object to store the circle sprite. Also define a Vector2 object to store the 2-Dimensional co-ordinate position of the circle. Here, I’m initializing the position vector object to zero. Also define another Vector2 object speed to add to set the speed of the circle.
Texture2D circle;
Vector2 position = Vector2.Zero;
Vector2 speed = new Vector2(4, 4);
Now, add the code to load the circle sprite in LoadContent() method.
1: circle = Content.Load<Texture2D>(@"Images/ball");
Now, modify the Draw() method to draw the circle sprite.
protected override void Draw(GameTime gameTime)
        {
            GraphicsDevice.Clear(Color.CornflowerBlue);

            spriteBatch.Begin();
            spriteBatch.Draw(circle, position, Color.White);
            spriteBatch.End();

            base.Draw(gameTime);
        }
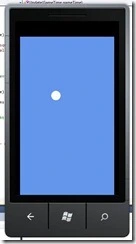
Add the following piece of code to your Update() method to increment the position of the circle along X & Y directions. position is a Vector2 object consisting of x & Y coordinates. We will now increment these values in Update() method and also see that the circle does not go out of the screen. The screen size of Windows Phone 7 is 480 X 800.
protected override void Update(GameTime gameTime)
        {
            if (GamePad.GetState(PlayerIndex.One).Buttons.Back == ButtonState.Pressed)
                this.Exit();

            if (position.X > Window.ClientBounds.Height - circle.Width)
                speed.X *= -1;
            else if (position.X < 0)
                speed.X *= -1;
            if (position.Y > Window.ClientBounds.Width - circle.Height)
                speed.Y *= -1;
            else if (position.Y < 0)
                speed.Y *= -1;

            position += speed;

            base.Update(gameTime);
        }
The If conditions check whether the circle is inside the screen or not. If it seems to go out of the screen, the X and Y components of speed are reversed so that the ball bounces of the edge of the screen. Window.ClientBounds.Height and Window.ClientBounds.Width return the Height and Width of the screen as in Portrait mode. That’s the reason I’m operating X coordinate with Height and Y coordinate with Width. We are subtracting the width and height of the texture to align the position of the ball. As you can see, the ball bounces off at little higher position from bottom. This is because that some space is reserved for some controls that you may want to give to the user at the bottom like some buttons, etc.. You can utilize the full screen by replacing Window.ClientBounds.Height by a particular integer value. In this case, the value will be 800.
The entire code of the game as of now will be
using System;
using System.Collections.Generic;
using System.Linq;
using Microsoft.Xna.Framework;
using Microsoft.Xna.Framework.Audio;
using Microsoft.Xna.Framework.Content;
using Microsoft.Xna.Framework.GamerServices;
using Microsoft.Xna.Framework.Graphics;
using Microsoft.Xna.Framework.Input;
using Microsoft.Xna.Framework.Input.Touch;
using Microsoft.Xna.Framework.Media;

namespace BubbleEvader
{
    /// <summary>
    /// This is the main type for your game
    /// </summary>
    public class Game1 : Microsoft.Xna.Framework.Game
    {
        GraphicsDeviceManager graphics;
        SpriteBatch spriteBatch;
        Texture2D texture;
        Texture2D circle;
        Vector2 position = Vector2.Zero;
        Vector2 speed = new Vector2(4, 4);

        public Game1()
        {
            graphics = new GraphicsDeviceManager(this);
            Content.RootDirectory = "Content";

            // Frame rate is 30 fps by default for Windows Phone.
            TargetElapsedTime = TimeSpan.FromTicks(333333);
        }

        protected override void Initialize()
        {
            // TODO: Add your initialization logic here

            base.Initialize();
        }

        protected override void LoadContent()
        {
            spriteBatch = new SpriteBatch(GraphicsDevice);

            texture = Content.Load<Texture2D>(@"Images/square");
            circle = Content.Load<Texture2D>(@"Images/ball");
        }

        protected override void UnloadContent()
        {
            // TODO: Unload any non ContentManager content here
        }

        protected override void Update(GameTime gameTime)
        {
            if (GamePad.GetState(PlayerIndex.One).Buttons.Back == ButtonState.Pressed)
                this.Exit();

            //if (position.X > Window.ClientBounds.Height - circle.Width)
            if (position.X > 750)
                speed.X *= -1;
            else if (position.X < 0)
                speed.X *= -1;
            if (position.Y > Window.ClientBounds.Width - circle.Height)
                speed.Y *= -1;
            else if (position.Y < 0)
                speed.Y *= -1;

            position += speed;

            base.Update(gameTime);
        }

        protected override void Draw(GameTime gameTime)
        {
            GraphicsDevice.Clear(Color.CornflowerBlue);

            spriteBatch.Begin();
            spriteBatch.Draw(circle, position, Color.White);
            spriteBatch.End();

            base.Draw(gameTime);
        }
    }
}
Bubble Evader Series
Happy New Year to everyone. Its been a very long time since I have blogged. So decided to write about creating games for Windows Phone 7. This takes you from scratch covering some basic concepts & components of simple games as well. I will be taking you all through to create a simple touch based game called “Bubble Evader” which I created few months ago as a requirement for being Microsoft Student Partner. In this game you require to move a square around the screen avoiding the bouncing balls. Longer you survive, more points you make. The number of balls also increase as your score increases. The game after you create would look like as in the video below. Stay tuned for the first in the series!


